Nowadays, everybody has a website. Doesn’t matter if it’s a blog or an e-shop, your own website can help you achieve your goals better. I remember times when creating a web portal took months of development. Today, the process can take less than 30 minutes. Thanks to variety of Content Management Systems (CMS), we can choose which one we like the most, upload it to our web hosting and execute the installation from user interface. Today I will show you how to build a WordPress site in 5 simple steps.
Introduction
WordPress is the most popular CMS out there. It is very flexible, easy to learn and operate, and there is thousands and thousands of plugins and themes in it’s online repository that can be installed directly from your site by a simple click of a mouse.

WordPress was invented in 2003 and it is based on PHP and MySQL programming languages. It has been through many iterations and releases, each bringing new features. Development has not stopped for a day since then and it is expected that WordPress will long for a very long time due to it’s popularity and success.
It’s also open-source, which means that if you’d like, you can edit any files you want without worrying about copyrights. My website, the one you’re currently on, is also built using WordPress and because I’m detail-oriented, I had to do a lot of customization directly in code. And you’d be surprised – if you have a basic knowledge of HTML, CSS and/or PHP, it is very easy to do.
Now that you know what you’re about to install, let us start!
1. Download WordPress file
WordPress comes as an archive file (either .zip, or .tar.gz) which you can extract using native Windows or Linux file browser. The newest version can always be found on WordPress homepage under Downloads. Click on the following link to access this page:
https://wordpress.org/download/
Save the file on your disk and extract it. You should now see many, many files contained in the extracted directory.

2. Create web hosting
In order to be visible on the internet, you have to have a web-hosting and a domain. If you already have one, you can simply skip this step, otherwise continue reading.
It’s fairly easy to create a web space. There are many providers out there which are extremely cheap. Having a hosting and a domain is very cheap nowadays, but be prepared to pay roughly $30/yearly – it’s not free after all. You can find inspiration in the following link, which compares some of the popular web hosting providers: https://www.hostingadvice.com/how-to/free-web-hosting/
3. Copy WordPress to your web space
When you finish your registration and pay for web space (and possibly domain, too), go to your account, or to admin panel. I can’t give you specific information on how to get there, because each provider has different set of tools, with different user interfaces. What you’re looking for is File Manager (or similar) – a tool which will allow you transfer your files onto your web space.
If you are a more advanced user, you can also do this through FTP. Credentials for FTP connections are available somewhere in your admin panel as well – it’s just about finding them. You can use software such as FileZilla to transfer files. The outcome is the same as uploading file through File Manager, so it’s indeed up to you what way you choose.
4. Create a database
Again, your admin panel should include section called MySQL, or Databases, or something similar. This is the place where you create a database. You need one – it’s a storage where WordPress will store everything related to your website, like posts, users, etc.
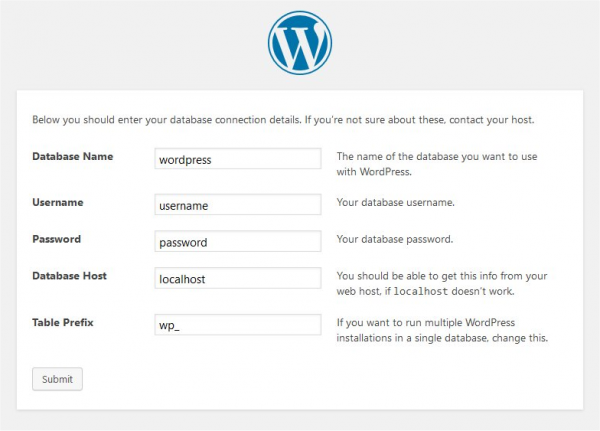
Chose a name for your database and save it. On some web hostings, you will also choose credentials for logging into the database. If this is your case, fill them in and save them somewhere so you don’t forget what your username and password were. After you’re finished, you should see all credentials required for connecting to database – hostname, username, password, database name.
5. Install WordPress
So you already have everything you need to install WordPress. When you created your web space, you had two options – either pay for domain, or use a free subdomain which comes with your web space. This is what providers usually do – even if you don’t pay for domain, you still have to have an access to anything you upload to your space. If this is your case, find the URL that points to your website in your admin panel.
Enter your URL to a web browser. You will be shown an installation page, which will guide you through the process. It’s fairly easy to do and the installation takes care of most of the things. All you got to do is enter credentials and information required when the installation process asks you to. Follow the instructions on the screen, there is no way you will get lost, trust me.
6. Login and start using
And you’re done. You have your website running! You can now browse your website or access administration page by adding /wp-admin at the end of the URL for your website. There is soo many things you can do. Start by browsing through the interface, reading documentation on the internet and watching video tutorials. It is very easy to get used to WordPress – as soon as you try it out, you won’t stop using it.
My tutorial was fairly easy and was not in depth and I want to keep it this way. But if you are looking for extended tutorial or information related to installation process, you can visit WordPress home page where every step is explained thoroughly:
https://codex.wordpress.org/Installing_WordPress
Hope you like the tutorial. Leave a comment if you need help or there is some part that I’m missing or you’d like to have more details about it.